How to make sourdough starter - step by step
Jun 25, 2025

The basis of every bread: how to make sourdough starter
Before you start baking, you need to cultivate a reliable baking partner – sourdough or levain. Believe it or not, every sourdough is original and there is only one. Although it seems incredible, no two are the same in the whole world.
In this article, we'll walk you through step-by-step how to start a sourdough starter at home - and why it's worth keeping a diary. It will save you a lot of nerves and flour.
Why bake with your own sourdough?
Baking with sourdough means baking the real thing. No yeast, no shortcuts, and the result is a taste, aroma, crust, and fluffy interior, or custard, that's like something out of a fairy tale. Plus, sourdough naturally extends the shelf life of baked goods, promotes healthy digestion , and smells so good you'll want to bake at midnight. The great news is that starting a sourdough starter isn't rocket science , so let's dive in:
What to prepare for starting the ferment
To get started, prepare:
– flour and whole grain flour (ideally wheat or rye)
– clean water (ideally settled)
– 2 transparent jars with lids (e.g. pickle jars)
– a scale, a small spatula, a spoon, a bowl and a rubber band
– time, patience and a notebook
– Greek yogurt or honey
![]()
At the very beginning, you can add a teaspoon of plain Greek yogurt or a teaspoon of sugar or honey. This will help start the fermentation process, in short, it will gently kick-start the first feeding process.
How to make sourdough step by step
Day 1
In a clean glass (number 1) with a volume of about 800 ml, put 80 g of water and at this stage add the aforementioned teaspoon of white Greek yogurt or sugar/honey and mix well, 70 g of plain wheat flour and 30 g of whole wheat flour . Mix, cover with a lid (loosely placed, not tightened or with a cotton cap ) and let the sourdough stand at room temperature of 24 °C until the next day. If it is colder where you are, somewhere up in the cupboard the temperature will definitely be a little higher.
Day 2
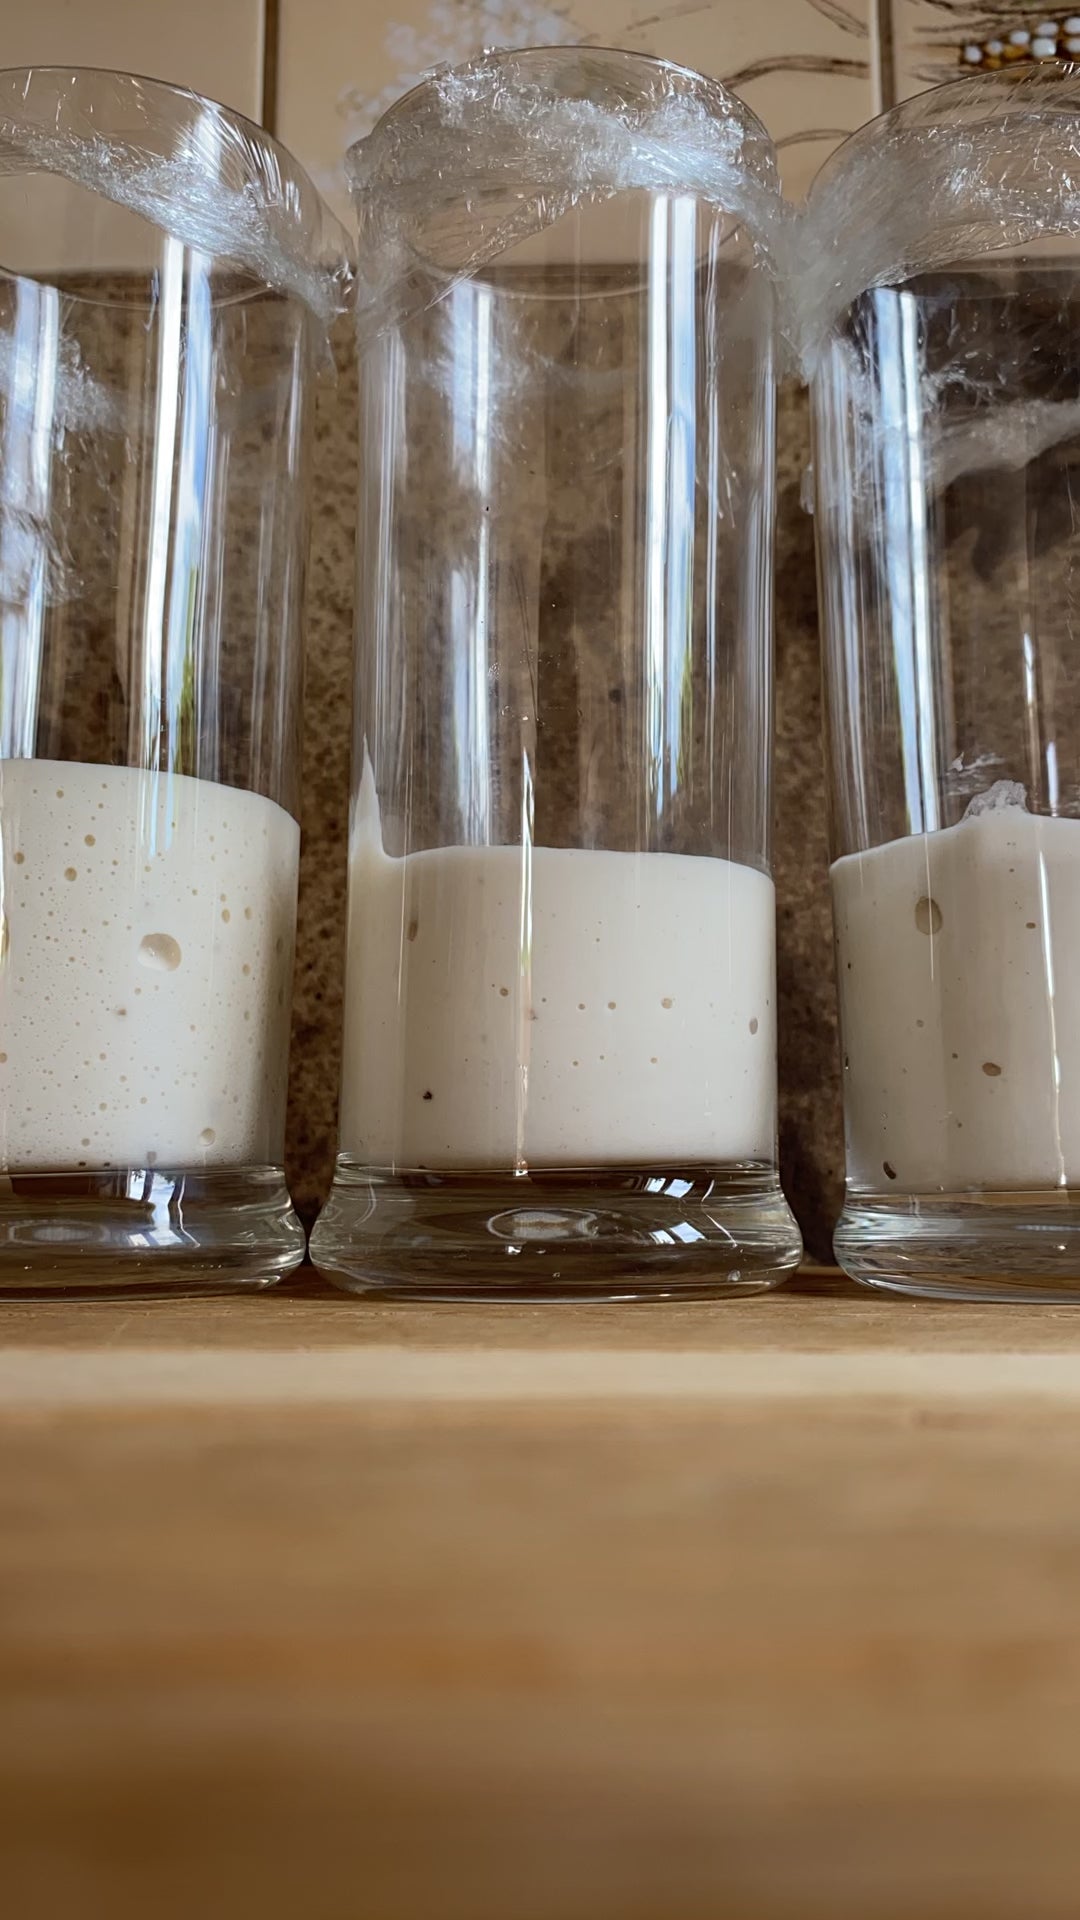
Check if something is happening with the sourdough in the jar. You should see small bubbles. If not, don't despair. Add another 80 g of water, 70 g of plain wheat flour and 30 g of whole wheat flour to jar number 1 (you will have about 360 g of sourdough in total). Note, from this feeding we do not add any more yogurt, sugar or honey . Mix thoroughly, cover with a lid in the same way as the previous day and leave at room temperature of 24 °C until the next day. It is important that the sourdough slowly starts to "breathe". Make sure that the edges of the jar remain clean with each feeding, without any leftover sourdough after mixing. Also get a rubber band to mark the top of the sourdough in the jar immediately after feeding. This will give you a better overview of how the sourdough is growing.
Day 3
Today you should see bubbles and more volume in the jar. So start “feeding” the sourdough: take 110 g of sourdough in a bowl, add 80 g of water, 70 g of plain wheat flour and 30 g of whole wheat flour, mix thoroughly (you will have 290 g of sourdough in total), put in a clean jar number 2 and cover with a lid in the same way as the previous day. Put a rubber band on the top of your sourdough in this jar. Let it stand at room temperature of 24 °C for about 12 hours or until the next day. Cover the remaining 250 g of sourdough in jar number 1 with a lid and put it in the refrigerator - this is the residual or discard , which we work with by adding spoonfuls to, for example, sponge cake dough, dumpling dough, or pancake dough, or use it diluted with water in a sauce, which will thicken it wonderfully. There is no need to put a rubber band on this jar and use it within 5 days at most.
Day 4
Remove about 220 g of sourdough from jar number 2 and transfer it to jar number 1, close the jar with a lid and return it to the refrigerator. You will have about 70 g of sourdough left in jar number 2 and add 80 g of water, 70 g of plain wheat flour and 30 g of whole wheat flour to it (so you will have 250 g of sourdough in total). Mix thoroughly, cover with a lid, secure the jar with a rubber band in the same way as the previous day and let it stand at room temperature of 24 °C for 8 to 12 hours. If not much is happening in the jar, leave it until the next day. Otherwise, feed it in the same way after 8 or 12 hours. So remove some of it to jar number 1 and return it to the refrigerator and feed your sourdough in jar number 2 in the same way.
![]()
Don't just track time, but watch the sourdough and see how it's doing. Has it doubled in volume since the last feeding? Does it have bubbles all over? Has a cap formed on the surface (a raised surface if you want)? Or is it sinking?
Day 5
After 5 days, the sourdough should be active: the volume should double, it should smell pleasantly sour (not like nail polish), the surface should have visible bubbles and when you poke it with a spoon it should be full of bubbles. You could start baking from today. The sourdough is not that strong yet, but the sourdough is there to bake. So don't be afraid that the bread won't be quite what you expected. From this day on, also reduce the feeding according to how often you bake and how much sourdough you need.
This article is about how to start your own sourdough. It's not about what flour to feed your sourdough with and at what intervals, or how to prepare sourdough for baking bread. We are now preparing a large e-book series on other topics that interest you.
Sourdough diary: a guarantee of how to make sourdough better every time
All you need is a pencil and paper or a notebook. Why start a diary? Write down everything from the moment you start the sourdough starter and the reward will be better pastries:
– the first entry in the diary should be when you started the starter
– what specific flour did you use?
– when did you feed, in what ratio and what temperature was the water used
– how the sourdough gradually looked and when and what bubbles gradually formed
– how sourdough behaves in dough during baking
– record the smell of the sourdough and over time you will learn how to recognize spoiled sourdough
– temperatures in the kitchen and outside (yes, both affect the sourdough), sourdough temperature
Thanks to these notes, you will gradually learn what works or what needs to be changed when the dough does not rise .
How do I know when the sourdough is ready for baking?
– it will double in size within 4 to 6 hours of feeding (feeding at a ratio of 1:1:1)
– has a slightly sour, clean aroma
– it is full of tiny bubbles on the surface and inside
What to do if baking fails?
Don't throw away the discard. It's a living organism and sometimes it just needs more time. Help it:
– try a different flour (some flour brands contain less live enzymes)
– increase the temperature (ideally around 24 to 26 °C)
– extend the time between feedings, sometimes it helps to shorten the time
– try other feeding ratios (e.g. sourdough:water:flour in a ratio of 1:1:1 or 1:2:4 depending on activity and your preference)
![]()
By writing down what you did with your sourdough every day, you'll soon see how it's doing and what works for it. This little baking diary will lead you to the bread of your dreams in just a few weeks.
And now you know how to make sourdough for home baking
If you've read this far, you've learned how to start a sourdough starter, and that it's not rocket science. It's more of a patient baking adventure and observation. If you don't succeed the first time, that's okay. The important thing is to get started and not get discouraged. Sourdough gives bread character. And it's worth a little extra flour and patience.
![]()
I'll tell you one thing. I recommend starting the sourdough only when you're already baking and you know the sourdough like the back of your hand. It's much easier because you already know what to expect. To start, I recommend finding someone in your area through the sourdough map and asking for the sourdough. Alternatively, contact a bakery that is happy to donate the sourdough. Just be careful here, this sourdoughis used to high performance, so don't be surprised after a few feedings and subsequent baking that it's not working and something is happening to it. It works, it just has to get used to the fact that it has to lose strength and performance.
Do you want to be sure that the sourdough will grow like water?
Download the free e-book How to Feed Your Starter Like a Pro and keep it handy at all times, or take Mari's baking class . She'll walk you through starting your sourdough starter step by step - in person.